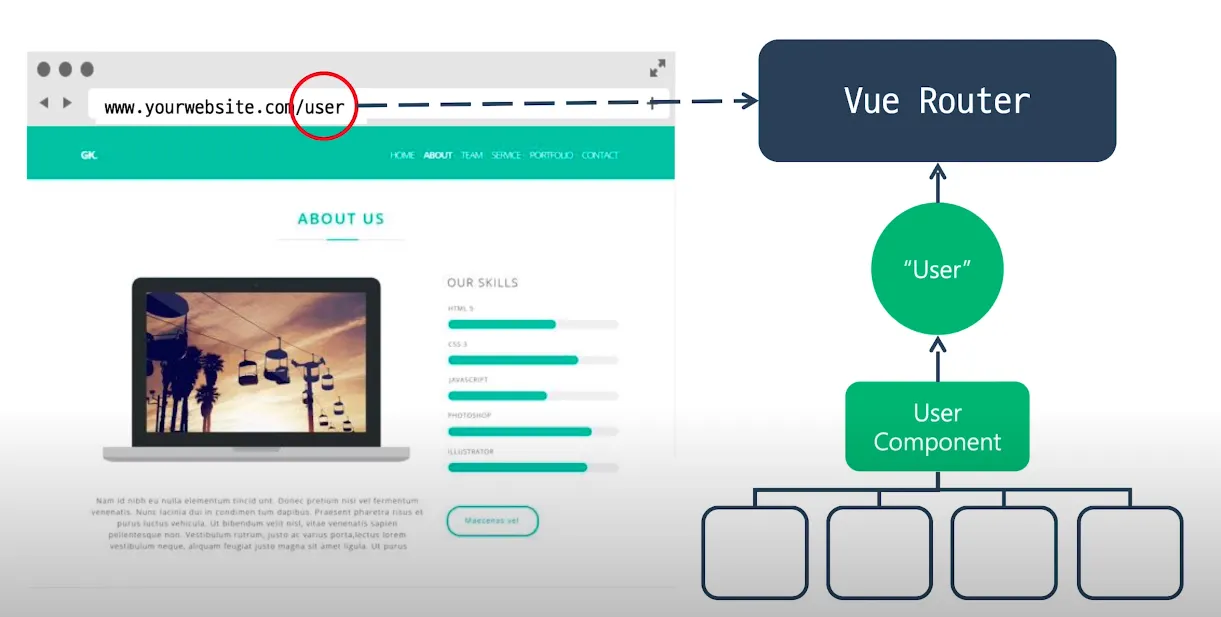
1. [ Vue.js에서 주소를 Controll하는 방법 ]
1.
주소를 먼저 Vue Router가 catch를 한다.
2.
자신이 가지고 있는 Router중에서 User라는 Router가 있는지 찾는다.
3.
User라는 이름으로 매칭시켜놓은 UserComponent를 찾는다
CLI 설치시 TIP
1.
npm install vue-router —save
•
#vue router 3.0.x ⇒ Vue2 (LTS 안정화버전)
•
npm uninstall vue-router → 설치를 지울때
•
npm install vue-router@next
2.
npm install vue-router@next
•
vue router 4.0.x → Vue3
잘못된 설치방법
npm install vue-router - - sabe
npm install vuer router -S
npm install vue-router node
2. [ Router의 구조 ]
•
Router는 기본적으로 router.js 파일을 따로 생성하여 작성한다
•
router.js에서 이용할 파일들을 import선언해준다
◦
import 작명 from 해당파일경로 (ex import Home from ./views/Home.vue)
import Home from './views/Home.vue'
JavaScript
복사
•
router는 객체형태로 각각의 router가 존재함
•
기본적으로 객체 안에는 path, name, component로 구성되어있음
[ Sample Code - router.js]
import Vue from 'vue'
import Router from 'vue-router'
import Home from './views/Home.vue'
Vue.use(Router)
export default new Router({
mode: 'history',
base: process.env.BASE_URL,
routes: [
// routes는 객체형태로 각각의 router가 존재하며
//path : 주소 , path와 연결되는 component를 설정한다.
{
path: '/',
name: 'home',
component: Home
},
{
path: '/about',
name: 'about',
// route level code-splitting
// this generates a separate chunk (about.[hash].js) for this route
// which is lazy-loaded when the route is visited.
component: () => import(/* webpackChunkName: "about" */ './views/About.vue')
}
]
}
JavaScript
복사
3. [ Router 동작 명령문 <router-view></router-view> ]
router가 동작을 하게끔 해줄려면 router 너가 만든것을 뿌려줘라는걸 알려줄 수 있는 장소가 필요하다, 장소를 선언하는 명령어 <router-view></router-view>


